
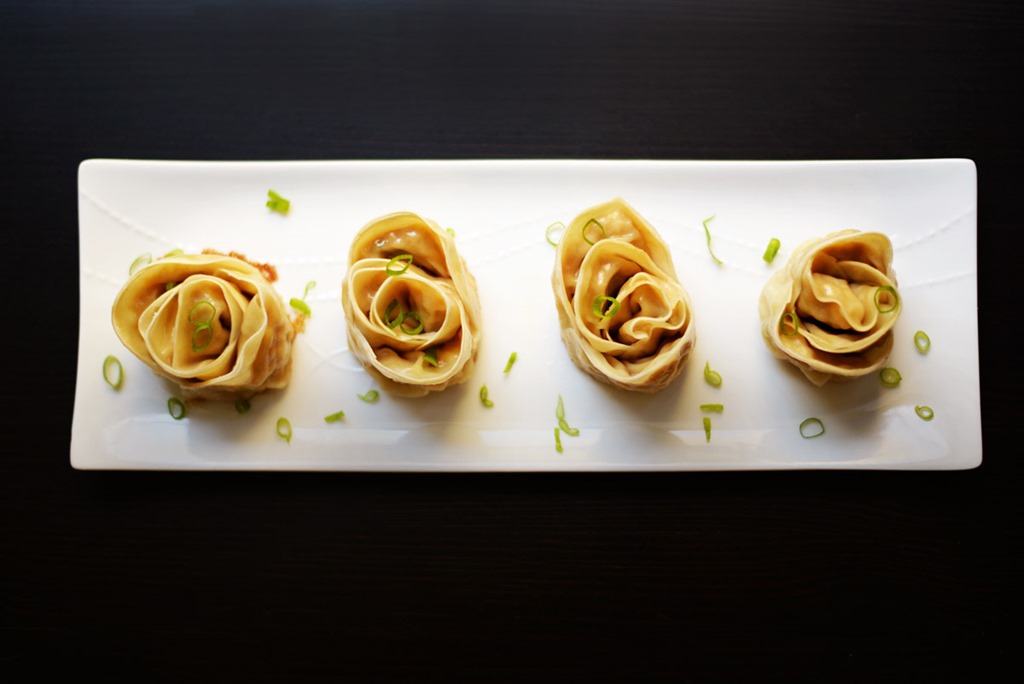
I’m just going to be honest and tell you that I made these rose shaped gyoza solely because they are so damn photogenic. There, I said it. Now that that’s out of the way, ok nevermind look how pretty…

I should open a dumpling café and sell rose gyoza dumplings at $12 a plate. Do you think people would pay for that? I’ll make the whole interior of the café with trendy décor, great lighting, and tables with lots of texture so people can sit and instagram their food all day. 15% off their meal if they tag us!
But guys…it would seriously work. Just a bunch of trendy foods like rose shaped gyoza, bubble teas in lightbulbs, those weird potato chip spirals on wooden skewers, poke bowls, and rolled ice cream.

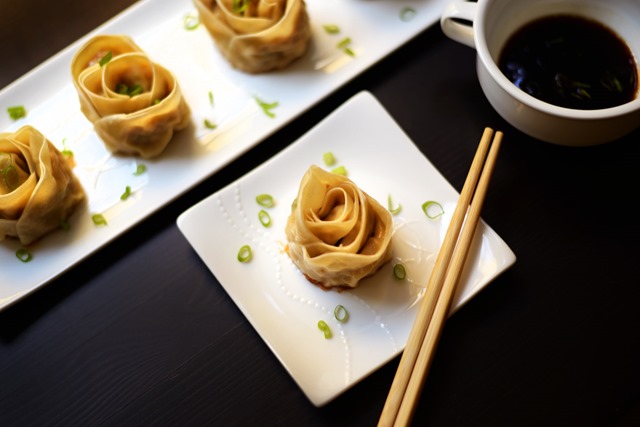
Check out the golden brown, crispy bottom of this pan fried gyoza. Just. look.
And they are surprisingly easy to make as opposed to the traditional pleated dumplings. Scroll below for the step by step photos.

These can be made with any kind of filling you usually use for dumplings. I used a ground chicken and shrimp filling seasoned with chopped green onions, hoisin, garlic and ginger. Ground chicken is pretty tasteless on its own, so that’s why I added the shrimp for a hint of sweetness and some texture.
One important tip is not to overfill the wrappers. You need them thin enough to be able to roll easily.
Another important tip is to find the thinnest gyoza skins you can for this. Rolling four dumplings together is going to be too doughy if the skins are too thick. I wouldn’t recommend Chinese dumpling wrappers because most of them are thicker than gyoza skins.
And last tip is to cook a spoonful of the filling (either on a small pan or nuke it in the microwave for 45 seconds) so you can taste it before proceeding to fill the gyoza, then add more seasoning or salt to your preference.
_____________________________________________________________________________________________________
Instructions with Photos:

Combine all the ingredients for the filling in a large bowl. Have a small bowl of water set up for dabbing onto the gyoza skins to seal them.
-
Place four dumpling wrappers (floured side up) on your prep station surface, overlapping them slightly, starting from the left to right. Dab some water underneath each overlapped area to secure it onto the other one.
-
Put a small spoonful of filling on the center of each gyoza skin. I used roughly 2/3 of a teaspoon on each wrapper.
-
Using your finger, dab water on the top half of each dumpling wrapper.
-
Starting from the right to left, fold each dumping bottom side to top, pressing the sides firmly together.
-
Starting from the left side, carefully and gently roll to the right side. Don’t roll too tight or else it will have trouble staying together and staying sealed.
-
Dab some water at the end of the dumpling ‘petal’ to keep it sealed together. Place rose gyoza upright on a plate lined with parchment or wax paper (to prevent it from sticking on the plate). Repeat with the rest of the wrappers until finished.

For the amount of filling I listed below, this would make 24 dumplings. I have 12 shown here, which is approximately one package of dumpling wrappers (48 gyoza skins).
If you aren’t cooking them the day you’re assembling these, they can go right into the freezer as they are shown above. Freeze them for 2 or more hours, then place in a zip-lock freezer bag.

Pour 2 tsp. oil on a pan, turn to medium/medium high heat. Place rose dumplings upright on pan, making sure enough space is between them.
Pan-fry until the bottom is golden brown. Use your spatulas to take a peek and make sure it is golden brown.

Pour enough water into the pan to immerse the dumplings 1/3 of the way up. IT WILL SIZZLE, SO BE CAREFUL!

Put a lid over it and cook for 7 minutes on high heat until the water has almost totally evaporated.

I take the lid off by the 6 to 6:30 minute mark to watch them carefully. If it surpasses the 7 minute mark, no worries. Just let the water cook off and evaporate.

When all the water has evaporated, carefully scrape off the pan with a spatula, and serve.

Ooooooh…..

Ok one more just because.
Check out all my other dumpling recipes!
Har Gow (steamed Shrimp Dumplings)
Rose Shaped Chicken and Shrimp Gyoza
Ingredients
- 2 packages of gyoza wrappers (approx. 96 wrappers)
- 1 small bowl of water (for sealing gyoza together)
- INGREDIENTS FOR FILLING:
- 1 lb. ground chicken
- 6 large raw shrimp, diced
- 2 stalks green onions, chopped
- 2 tbsp. grated ginger
- 2 garlic cloves, minced
- 2 tsp. soy sauce
- 1 Tbsp. hoisin sauce
- 1 tbsp. cornstarch
- DIPPING SAUCE:
- 2 parts low sodium soy sauce
- 1 part rice vinegar
- drizzle of sesame oil
- dash of white pepper
- chopped green onion
Directions
- Step 1 Combine all the ingredients for the filling in a large bowl. Have a small bowl of water set up for dabbing onto the gyoza skins to seal them.
- Step 2 Place four dumpling wrappers (floured side up) on your prep station surface, overlapping them slightly, starting from the left to right. Dab some water underneath each overlapped area to secure it onto the other one.
- Step 3 Put a small spoonful of filling on the center of each gyoza skin. I used roughly 2/3 of a teaspoon on each wrapper.
- Step 4 Using your finger, dab water on the top half of each dumpling wrapper.
- Step 5 Starting from the right side to left side, fold each dumping bottom side to top, pressing the sides firmly together.
- Step 6 Starting from the left side, carefully and gently roll to the right side. Don’t roll too tight or else it will have trouble staying together and keeping its shape.
- Step 7 Dab some water at the end of the dumpling ‘petal’ to keep it sealed together. Place rose gyoza upright on a plate lined with parchment or wax paper (to prevent it from sticking on the plate). Repeat with the rest of the wrappers until finished.
- Step 8 Pour 2 tsp. oil on a pan, turn to medium/medium high heat. Place rose dumplings upright on pan, making sure enough space is between them.
- Step 9 Pan-fry until the bottom is golden brown. Use your spatulas to take a peek and make sure it is golden brown.
- Step 10 Pour enough water into the pan to immerse the dumplings 1/3 of the way up. IT WILL SIZZLE, SO BE CAREFUL!
- Step 11 Put a lid over it and cook for 7 minutes until the water has almost totally evaporated.
- Step 12 I take the lid off by the 6 to 6:30 minute mark to watch them carefully. If it surpasses the 7 minute mark, no worries. Just let the water cook off and evaporate.
- Step 13 When all the water has evaporated, carefully scrape off the pan with a spatula, and serve.
- Step 14 *TIP #1: If you aren’t cooking them the day you’re assembling these, they can go right into the freezer as they are shown above. Freeze them for 2 or more hours, then place in a zip-lock freezer bag.
- Step 15 Do not to overfill the wrappers. You need them thin enough to be able to roll easily.
- Step 16 *TIP #3: find the thinnest gyoza skins you can for this. Rolling four dumplings together is going to be too doughy if the skins are too thick. I wouldn’t recommend Chinese dumpling wrappers because most of them are thicker than gyoza skins.
- Step 17 *TIP #4: cook a spoonful of the filling (either on a small pan or nuke it in the microwave for 45 seconds) so you can taste it before proceeding to fill the gyoza, then add more seasoning or salt to your preference.


 Hi and welcome to Soupbelly! My name is Candy and I run a frozen dumpling business. You can find me at pop ups in the Atlanta area.