
This is my own potsticker recipe I have perfected over the years. It is a cross between my mother’s recipe and traditional gyoza potsticker recipes I have tested. I will bet my firstborn’s entire Pokémon figurine collection, t-shirts, movies and books that you will enjoy these.
No really….please take them all.
If you think the recipe calls for a little too much cabbage, it doesn’t. They mix right into the meat filling and almost disappear aside from seeing some green peek out here and there. I would add more if you want more. I’ve tested using only half a head of cabbage before but found the filling didn’t have the right balance unless I use an entire head.

If you need more step by step photos on how to make the pleats in the wrapper, go to my other potsticker recipe here. I realized it’s harder to explain it in words and I, like most of you are visual learners.
The way this is similar to my mother’s recipe is because I add chicken broth to the filling. Lots of recipes tell you to remove moisture, or to cook the cabbage before adding to the filling. I am a rebel therefore I do the opposite. Just kidding, there’s no logic in that. But I never thought most fillings had enough moisture, and the meat was always too dense. On top of that, I only used the green leafy parts of the cabbage, not the thick white stalks, therefore it’s not adding enough moisture as I would prefer. The filling soaks up the 1/2 cup of broth I add like a sponge, and the cornstarch helps the meat retain the broth until you cook it.

These are the type of wrappers I used. I always use gyoza wrappers because I love how they’re less doughy than Chinese style wrappers, and I like the chewy consistency after they fry up. These packages have around 44 wrappers each (weird number, I know) so I use around 2.5 packages each time I make dumplings.
I always make large batches of dumplings so I can freeze them for future meals (instructions on how to do this are at the bottom of this post).

Always place the filling on the floured side of the wrapper. This way when you add water to the edges, it will make a sticky paste combined with the flour and create a better seal when closing up the dumplings.


Two ways of making the pleated dumplings. The process of folding the pleats are identical, however the difference lies in how you place them on the pan. The first way is to place them with one side flat on the pan, and the other way is to place them so the dumpling is sitting upright, creating a bottom in between both sides.
Ok, are you guys ready to make some dumplings?!
___________________________________________________________________________________________
Instructions with photos:

In a large bowl, combine all the ingredients except the gyoza wrappers.
I mean…I shouldn’t need to say ‘except the gyoza wrappers’ but you never know. Some people just….but not you!

This is what I mean when all the cabbage blends right into the meat.

Add the chicken broth and stir up until the filling absorbs all of it.


Now the filling looks like the heaping mound of meat they use at dumpling cafes or dim sum restaurants.
That means success, if you didn’t know.

The floured side of the dumpling wrapper should be facing up. Place a heaping teaspoon of filling into center of dumpling wrapper. Dab water on the edges, press firmly shut to form a half-circle. Repeat process until finished.
Here is the link for step by step pleating instructions.
I realized I didn’t really show you how to pleat here…at least I have my old recipe photos to fall back on, back when I was less forgetful and lazy.

The two ways you can place the dumplings on the pan: flat on its back, or on it’s butt. Laying down or sitting.
I have a way with descriptions. Almost in a poetic way.
T
Pour 2 tsp. oil on a pan, turn to medium/medium high heat. Place dumplings flat side down on pan, making sure enough space is between them.
I like how they fit together like a puzzle when I place them upright, so sometimes I make them this way when I feel fancy.

Pan-fry until the bottom is golden brown. Use your spatulas to take a peek and make sure it looks like this.

Pour enough water into the pan to immerse the dumplings halfway. IT WILL SIZZLE, SO BE CAREFUL!

Put a lid over it and cook for 7 minutes until the water has almost totally evaporated.

I take the lid off by the 6 to 6:30 minute mark to watch them carefully.

When all the water has evaporated, carefully scrape off the pan with a spatula, they will be sticking (hence the term ‘potsticker’).

Give the pan a good shake or two to loosen them up.

If you’re still feeling fancy, wear your oven mitts, grab a large plate to put over the pan and flip upside down. It is tricky so I don’t recommend you try this unless you’re confident (or reckless like me).
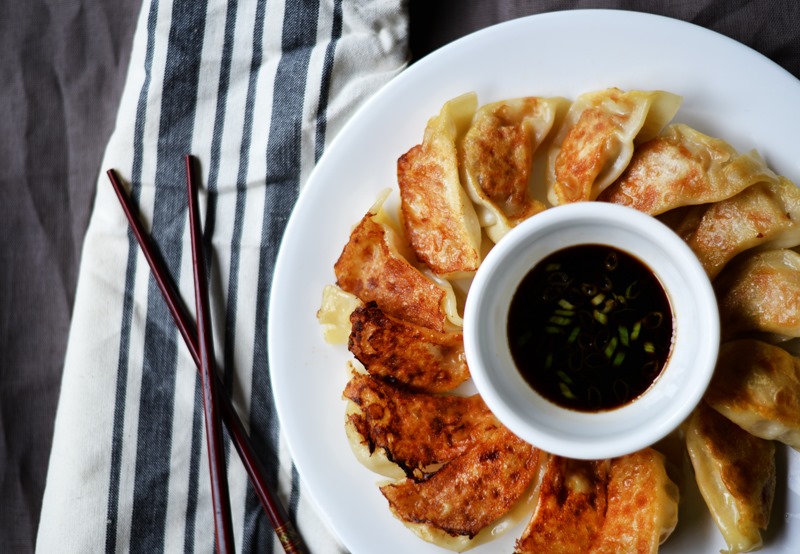
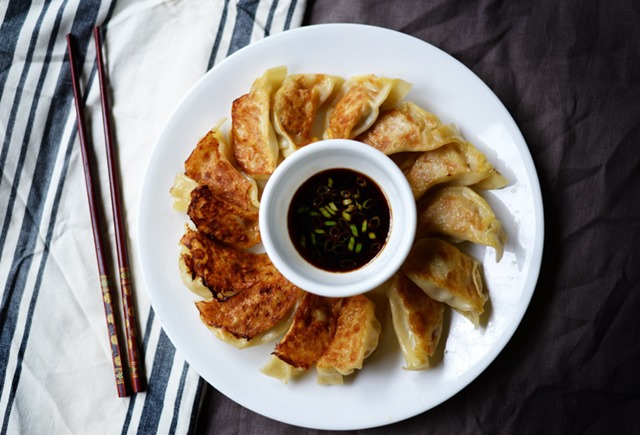
But look how pretty….like a pinwheel that you can shove into your face.


Pork and Cabbage Potstickers
Ingredients
- 1.75 lbs. ground pork
- 1.75 lb. Napa cabbage (white parts discarded, green parts reserved and finely chopped – will not equal 1.75 lbs in the end!)
- 1 1/2 Tbsp. cornstarch
- 3 cloves garlic, minced
- 4 Tbsp. grated ginger
- 1 1/2 tsp. salt
- 1/2 cup chicken broth
- 3 packages of gyoza wrappers (totaling about 100 wrappers)
- DIPPING SAUCE:
- 2 parts low sodium soy sauce
- 1 part rice vinegar
- drizzle of sesame oil
- dash of white pepper
- chopped green onion
Directions
- Step 1 In a large bowl, combine all the ingredients except the gyoza wrappers.
- Step 2 The floured side of the dumpling wrapper should be facing up. Place a heaping teaspoon of filling into center of dumpling wrapper. Dab water on the edges, press firmly shut to form a half-circle. Repeat process until finished. Scroll up for link to step by step photos on how to make pleats in dumplings.
- Step 3 Pour 2 tsp. oil on a pan, turn to medium/medium high heat. Place dumplings flat side down on pan, making sure enough space is between them. Pan-fry until the bottom is golden brown.
- Step 4 Pour enough water into the pan to immerse the dumplings halfway. IT WILL SIZZLE, SO BE CAREFUL! Put a lid over it and cook for 7 minutes until the water has almost totally evaporated. I take the lid off by the 6 to 6:30 minute mark to watch them carefully.
- Step 5 Carefully scrape off the pan, they will be sticking (hence the term ‘potsticker’). Repeat the process until finished.
- Step 6 To freeze uncooked dumplings: place dumplings in a single layer (not overlapping) on a wax paper lined baking sheet. Place the baking sheet on a flat surface in the freezer for 45 minutes. Take them out and place them in zip-lock freezer bags.
Other dumpling recipes you might like:


 Hi and welcome to Soupbelly! My name is Candy and I run a frozen dumpling business. You can find me at pop ups in the Atlanta area.